Wednesday, 5 November 2014

Microsoft Band (day 6: data)

Short update today, answering two questions I've heard a lot about the Band:

  • Can the data be exported?
  • Does it work for cycling?

Can data be exported?

The short answer here is "no"; at least I have not found a way to get any of the raw data out of the Band or the Microsoft Health app. There are Connected Apps partners with Microsoft, including RunKeeper, so I signed up for their service to see how much data is shared.

The first problem with Connected Apps is that (apparently) your past data is not shared. This meant that after I joined there was no way for me to upload the half-marathon data from last weekend. New activities, however, seem to appear on RunKeeper as soon as they're sync'd to Health.

The second 'problem' is that only a summary of each activity is available... here is the information available on RunKeeper after a 5 km run this evening:


No details are available in the Connected App - no kilometer splits, elevation chart, map track or heart rate data :-( I would really like to get the running data (heart rate, GPS track as GPX) from my Band activites, and/or sync them automatically with Strava... however if the only integration possible with Strava is a 'summary' such as that shown above - I wouldn't bother!

Interesting statistic shown on the RunKeeper website...
1139 RunKeeper users also use this app
I wonder just how many Bands have been sold so far...


Does it work for cycling?

There's no particular reason why the Band won't collect data (GPS track, heart rate, etc) from a cycling effort as well as a run... I tried it out and it works fine. The problem with this is categorizing that workout in your training records. The speed/average pace recorded for a bike ride will far exceed your running capacity ;) and the heart-rate will be a lot less; making the calorie calculations also useless. 

If metrics are important to you (and they probably are, if you're reading this), then "no" the Band isn't much use for cyclists compared to the myriad of other options available.

Monday, 3 November 2014

Microsoft Band (day 5: rest)

No running after the half-marathon, so I thought I would blog some random info about the Band today.

Configuring the Run tile

I mentioned that you can change which stats are displayed while running - to do so click on the Band (top-right of screen) and choose Manage Tiles. This shows the list of available tiles with a 'switch' next to each that lets you show/hide the tile on your Band.

Some tiles have additional options (indicated by an 'edit pen' icon). Touch the row to configure; in the case of the Run tile it will display a screen explaining the options and an Edit button at the bottom of the screen. The final Run Settings screen lets you click to edit which run statistics are displayed on the Band screen:

Finding your historical heart-rate data

I just assumed that the band was monitoring my heart-rate and step-count all the time, but it took me while to find the data in the app. You would expect to access it somewhere in the Activity History screen, but that only contains Runs, Workouts, and Sleeps.

Instead touch the steps count on the main screen. This will take you to the rendering for a the current day's steps (as a histogram), with heart-rate graphed in the background. Touch the graph to switch to heart-rate view; or scroll down to view past day's step summary... notice the gap in this data (middle screenshot) -- the Band was off my wrist for charging :-)


You can display data for past days by tapping one of the past-day rows. The historical data has a darker header color (almost black, not purple), and you can view the steps and heart-rate data throughout the day... this is half-marathon race day:

Flashlight!

Just kidding... kinda. There isn't a Flashlight tile... but it is amazing how much light the Band emits when showing the menu (I've chosen a lime green theme, so it's quite bright). In a darkened house I can easily navigate around using the ambient light from the Band's screen...

If you want total darkness from your Band, enter sleep mode (if you're actually going to sleep) or else turn Watch Mode off so that the screen doesn't even show the time.

Sunday, 2 November 2014

Microsoft Band (day 4: race)

Today I wore both the Band and my Garmin Forerunner 10 in the US Half-marathon (San Francisco) to compare their usability while running and the data they collect.


TL;DR I love having the extra data from the Band after the race (eg. heartrate) but without Strava integration to view the data in more detail I can't leave my Garmin behind just yet. Sadly the secondary readouts (heart-rate and distance) on the Band seem too small to read easily while racing.

The Band

I wore the band on a different wrist to the watch and it definitely felt heavier than the Garmin, however I hardly noticed the difference once I started running. I started the GPS detection at the same time on both devices; the Band was ready to go a lot faster than the Garmin.

As I mentioned in an earlier post: I love that the Band has the heart-rate and GPS sensors built-in, so it can do all this without requiring a phone nearby!

The Race

While running both devices seemed to keep similar distance/pace time, with the km splits being pretty consistently recorded. The Garmin beeps at a km split which is fine, but sometimes I hear the beeps from other runners' watches around me and I look down for a split and it's not there. The Band vibrates so there's no false-positives... I know when I glance down that the split time will be there. The more direct feedback is a nice touch :-)

The 'run tile' display looks like this (apols for the image quality):


I've configured it via the app Band > Manage Tiles > Run to show heart-rate, distance, and duration. This means the pull-down drawer will show calories and current pace. Double-tapping the action button will cycle between the currently displayed data so that each element occupies the bottom (larger) position. This is useful, since I found it tough to read the two smaller numeric readouts while running... I almost wish the entire display could be set to show one stat really large, and the double-tap could then cycle between that view and the more crowded setup shown above...

I mainly glanced down at the Band when it vibrated to indicate a km split; it was slightly easier to read that view (I think because the numbers weren't changing). I didn't find myself looking at the heart-rate display much during the race... maybe because I wasn't sure to do with that information anyway.

I used the Garmin more frequently to gauge my progress since I found its display easier to read on-the-run.

The Results

The main reason to wear both devices was to compare the results - Microsoft Band and Health app versus Garmin Forerunner 10 and Strava - so here they are:

Summary

The Garmin slightly over-estimated the distance (but so did the Band, by slightly less) - they are both accurate enough, but I guess the Band did better. The average pace is the same for both, however the calories estimate is again way off. I've no idea how it decides the Fats and Carbs calorie numbers... nor which is more "correct".

The Microsoft Health app has the heart rate info: average, high, and low; and also the Recovery Time which I presume is some sort of indication of how long you should wait before exercising again? They really need to help us out with how interpret some of this stuff!


Pace

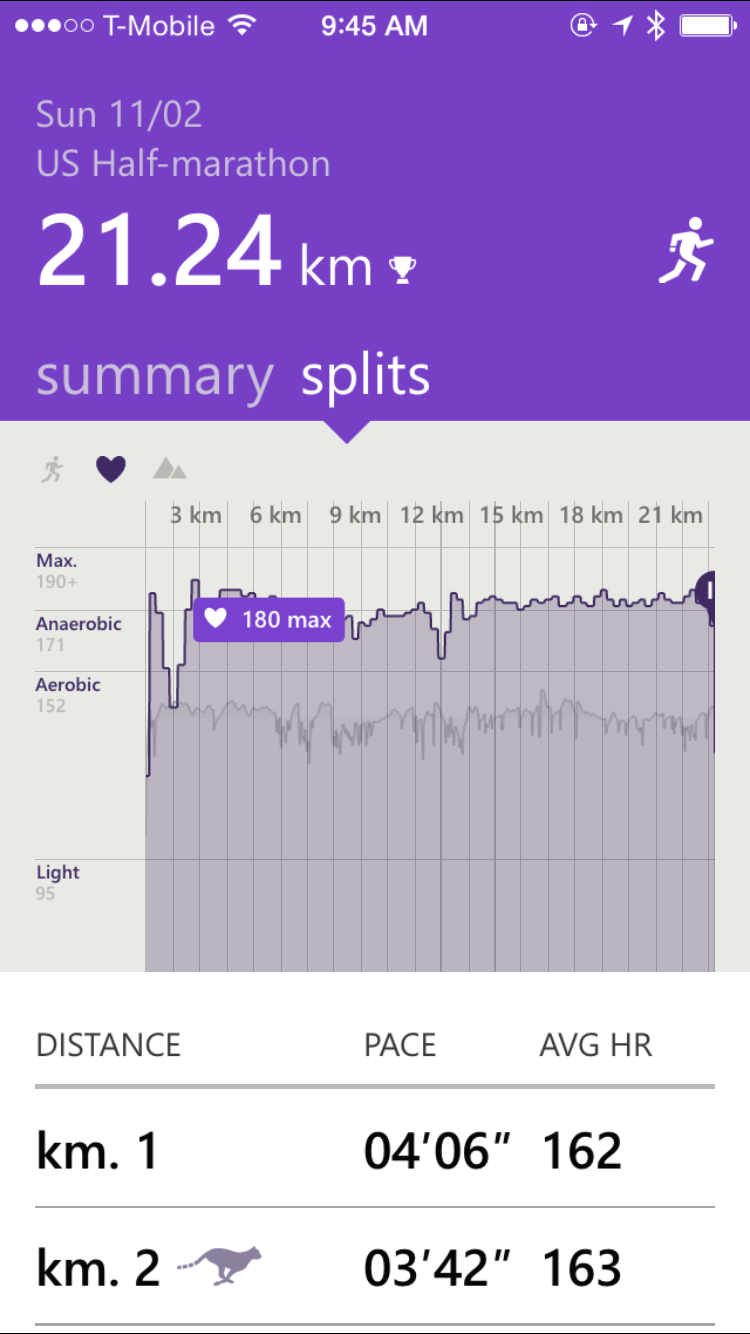
The pace data for the Band is shown along with the heart rate and elevation in graph form (below). The problem with looking at this information in the app is how compressed it is - you can't easily "zoom in" to see the variations in pace or elevation over time.


By contrast, the same data in Strava (minus heart rate, which my Garmin watch doesn't record) is much easier to interpret:


Until Microsoft Health has similar visualizations (or they are able to integrate with Strava), I won't be able to use the Band on its own... I like these graphs too much :)

Map

Here's the two maps side-by-side. The GPS accuracy seems fine for both devices - neither had a major error (which does sometimes happen). Microsoft Health has the neat speed-coloring, but again it's hard to see the details inside an app. The Garmin data rendered by Strava is much easier to zoom in and browse around.


Splits

Finally, just for the sake of it, here's the two sets of splits from the Band and the Garmin. Easily close enough to be considered equally accurate over the distance. The nice thing about the Strava presentation (which you can't see here) is how interactive their rendering is: hoving over a split highlights the map and helps you visualize the elevation and location on the course.

The Battery

Because I wore the Band overnight I only had a short time to re-charge it before the race, so it was showing as 80% charged when I left for the start line. To really test it, I left the display lit the entire race (although you can press the power button to show and dim it while running). At the end of the race (around 90 mins) the battery indicator looked to be around 50%... it's not very accurate but perhaps some indication of how long the battery could last while running with GPS enabled. The Band worked throughout the rest of the day - receiving notifications and step-counting - finally complaining about low-battery around 8pm... a little over 12 hours of use including the race.

Conclusion

I still really like the Band (despite this little problem) and will continue to train with it in addition to my Garmin for a while yet. Some of the non-running functions (like notifications) have been almost as much fun to play with as the running features :)

Saturday, 1 November 2014

Microsoft Band (day 3: sleep)

One of the interesting side-effects of how quickly I got used to wearing the Band was that I decided to give the sleep monitoring a try. I had previously been cynical about how comfortable these devices would be to sleep in, let alone wearing it every night... but I'm also curious about the data it collects so I'll be sleeping with it for a while at least :)


This is the sleep data it collected - the night before a half-marathon (and daylight savings switch-over) so it shows me getting up very early. I already know that I wake up through most nights... usually I need water... but it's interesting to see this information tracked accurately. Also interesting to learn how much of the night is actually restful versus light sleep:


I think I usually fall asleep much quicker than 15 minutes, I guess the Band will answer that question too over time.

Tapping on the graph switches to 'heart rate view', more interesting data! Hard to spot any correlations here (eg. between heart rate and restful sleep) but it'll be interesting to revisit after a longer period. The graph looks like this:


The one tricky part about using the Band for sleep monitoring is you lose an opportunity to charge the battery overnight. The device can get to 80% charge pretty quickly (maybe 40 minutes, definitely less than an hour it seems) so my plan is to charge at least that much each morning after waking up.

To get the battery to 100% takes a lot longer, I haven't timed it but seems to be a few hours (?). Not sure why that last 20% takes so long, I guess I'll find out if 80% is enough to get through most days... I've read people are getting at least 2 days of use (notifications, step counting) on a single charge as long as they don't enable GPS. Since I plan to run using GPS tracking daily, will have to wait and see what sort of battery life I get.

Friday, 31 October 2014

Microsoft Band (day 2: pairing)

Sadly, day 2 of my Band experience was not as much fun as day 1.

As I was excitedly demonstrating how notifications from my phone appeared on the Band... they stopped appearing :-( I didn't think to try and debug the issue right away, so I just kept the Band on collecting data.

Next morning when I went to view my sleep data on my iPhone (more on that in future), the Band wouldn't sync data at all! Just this message:
Band error - I can't find your Band. Please make sure it is nearby and paired or go to My Microsoft Band to register a different one.

I was immediately pretty concerned! I looked through the menus on the Band but did not find anything helpful. I checked the pairing and it seemed to be paired fine (although I discovered later it wasn't), so I went to My Microsoft Band as they suggested.

ARGH! Now it sounds like I am going to lose data :-(
Unregister Band? Default tile and notification settings will be erased and you will need to factory reset your Microsoft Band.

I panicked some more, and tried the Help feature in the app... OMG Microsoft WTF. Microsoft Health's in-app Help (on a mobile device!) just goes to the Support Home Page on the web (where, by the way, it's impossible to find anything related to Band).

Worst. User. Experience. Ever.


Finally after much screwing around with various settings, it appears that you need to be paired to TWO "bluetooth devices" for a Band... one with an "LE" suffix and one without (as shown). This is about 30 minutes of various rebooting and re-pairing attempts.


I have no idea what caused the pairing to fail in the first place, it just seemed to step receiving notifications at some point, and then not be able to connect at all.

Anyway... my Band is back online and all my data appears to be intact. It was not my ideal second-day experience, however; and at this point I'm a little less like to shift to this as my primary running device if the data is potentially lost so easily.

I like everything else about it so far though, so I'll keep playing!

Thursday, 30 October 2014

Microsoft Band (day 1)

I had no clue Microsoft was working on the Band until the reviews starting to leak out last night, but I was immediately keen to try one out. Today I dropped by the Microsoft Store at opening to pick one up, and I'm happy to report it's actually a pretty cool piece of tech.

Let me start by saying two things: (1) I really wanted to like the Band ~ smart watches don't really appeal to me but this feels smaller, less obvious and more focused that the Apple and Android devices (2) my primary use-case is running - with GPS and heart rate recording - so that is my measure of the device's success.

TL;DR I like the device a lot, my initial impression is that it does what I want while running and it pleasantly surprised me in a lot of other ways as well.


Features

The initial setup was painless: I downloaded the Microsoft Health app to my iPhone, paired the Band and was immediately able to receive alerts (texts, voicemail alerts, etc) on the Band. The app was easy enough to figure out: I changed the color scheme and turned on Facebook, Twitter, Notifications... and everything just worked.

Using the Band's menu on the phone screen is surprisingly smooth - although I'm not sure how people will bigger hands will find it. The device itself is less bulky than I expected (especially on my small wrist)... don't get me wrong it still feels "big" and looks a little "wide", but it's not heavy and after I'd worn it for a while I barely noticed it.

Playing around with heart-rate monitoring, calendar, notifications, alarms, the step counter, the UV detector and the workouts feature was a lot of fun; but as I said my primary concern was using it for run training...

Running

I was easily able to figure out how to get everything working, but here is the running "support page" for reference. To be clear - you do NOT need your phone with you while running! The GPS functionality is built-in to the Band, along with the step-counter and heart-rate monitor, so you get plenty of good data while exercising without dragging a phone around :)

To compare the accuracy and usability of the Band I wore my Garmin Forerunner 10 for comparison. They both took a while to 'find satellites' (and it always feels like forever when you want to start running), but the Band was actually ready slightly ahead of the Garmin.

During the run, they both kept in pretty close sync, beeping out kilometer markers at roughly the same time (and therefore showing similar splits). There was a bit of drift between them but nothing dramatic. The screen of the Band was constantly lit (which was great, as I was running at night), and the elapsed time is pretty easy to read. The heart-rate text is pretty small to read while you're moving unfortunately.

Your pace is available by 'swiping down' on the screen while you're running. It auto-hides after a while, returning the display to the elapsed time and heart-rate. I haven't got pictures of these screens and haven't found them on the support site yet. At each kilometer marker (or mile if you must) it beeps and shows your pace-per-kilometer/mile for a few seconds, before again reverting to the elapsed time display.

After the run was over, I uploaded my Garmin data to Strava (as I normally do) so I could compare the results. The Band seamlessly sync'd its data to my phone as soon as I opened the Microsoft Health app.

Summary Data

Here's the summary info from the Microsoft Health app versus Strava's view of my Garmin-collected data. Both compare pretty well - the Calories calculations are fairly different (something to investigate further) but the distance and pace are pretty close. The best thing about the Band is the inclusion of heart-rate info, without the hassle of a chest-strap or other additional device.


The Band also has an interesting 'Recovery' estimate (not shown) which I'm still to learn more about.

Map

Here's the two maps (Band/Health app vs Garmin/Strava). The Band does cute color-coding of pace, I'm not sure whether Strava can do that with more information (it does not have any heart rate data available as the Garmin Forerunner 10 does not support that). The Band track seems a little more accurate, but with a sample size of one it's a little early to draw conclusions about that.


I'm not sure what to make of the Band coloring a 4'20" kilometer as "snails pace" (jk :-)

Splits

Both provide similar splits data, although the data varies slightly (due to GPS variance).


Graphs

The Microsoft Health app shows pace, heart-rate and elevation. Strava doesn't get heart-rate data but graphs the other two (note the Garmin's GPS error causing a pace calculation error in the Strava graph around the 2km mark).


Navigating around the map, splits and graphs is fairly easy once you figure it out. Just tap and swipe around until you get the hang of it.

Conclusion

After less than a day it's probably a bit early to draw conclusions, but I overall I had a lot of fun playing with the Band today. Can't wait to race with it and check the data against the watch (and to see heart-rate info for the first time in ages). Here's hoping the number of app integrations increase and they eventually work out sync'ing with Strava!

Tuesday, 30 September 2014

iPhone 6 and 6 Plus LaunchScreen.storyboard for Xamarin

Following on from the previous post about adding launch images for iPhone 6 and 6 Plus, here are the instructions for adding a LaunchScreen.storyboard file instead of multiple fixed-size images. Apple's documentation recommends this method over using the static images. I used these instructions for replacing launch images with storyboards as a reference.

Configuring a LaunchScreen like this will automatically scale up your app for iPhone 6 and iPhone 6 Plus devices. You might also want to consider adding @3x retina images for iPhone 6 Plus support.

1. Add a new Storyboard to your project and call it LaunchScreen.storyboard.

2. Drag a UIViewController in and design your launch screen. I chose a black background with some white centered text - it looks like this (use the VIEW AS option to preview in different sizes):
3. Open the iPhone application Project Options and scroll down to the iPhone Launch Images section. There is a new Launch Screen dropdown (currently in Beta) that will automatically be populated with the available storyboards and xibs in your project. Choose the storyboard you just added.
3a. This creates the following key in your Info.plist (just FYI):
 <key>UILaunchStoryboardName</key>
 <string>LaunchScreen</string>

4. When you build the app, appropriate launch images will be generated for your app. Here's a shot of the emulator starting up showing the launch image for iPhone 6:

I've updated my Xamarin.Forms Todo sample, the code and storyboard are available on github.

UPDATE: Gerry reminded me about Marco's experience where adding a LaunchImage.storyboard file causes iOS to ignore the UIDeviceFamily setting in Info.plist (which specifies iPhone/iPod, iPad, or Universal app) and upscale iPhone-only apps to full iPad screen size (potentially making your app look really weird!). This behavior still appears to occur on the simulator, so test before you launch :)


Monday, 22 September 2014

iPhone 6 and 6 Plus Launch Images for Xamarin

I was initially stumped by how to get my Xamarin.iOS and Xamarin.Forms apps to size correctly on the iPhone 6 and iPhone 6 Plus. Thanks to this StackOverflow question & answer I have a solution - reposting here because the solution that works best for me right now is only the 3rd most popular answer there.

Simply create two new default images (this is for portrait only, but landscape will become obvious later):

Default-667h@2x.png for iPhone 6; dimensions 750x1334

Default-736h@3x.png for iPhone 6 Plus; dimensions 1242x2208

and place them in the application root or the Resources folder. Notice the filename format is similar to the Default-568h@2x.png image that Apple introduced for the iPhone 5 screen.

Now edit the source of your Info.plist file (open in a text editor so you can type XML directly) and add the following UILaunchImages key (the first two items are for iPhone 6, the others are for the older default image configuration):

<key>UILaunchImages</key>
<array>
<dict>
<key>UILaunchImageMinimumOSVersion</key>
<string>8.0</string>
<key>UILaunchImageName</key>
<string>Default-667h</string>
<key>UILaunchImageOrientation</key>
<string>Portrait</string>
<key>UILaunchImageSize</key>
<string>{375, 667}</string>
</dict>
<dict>
<key>UILaunchImageMinimumOSVersion</key>
<string>8.0</string>
<key>UILaunchImageName</key>
<string>Default-736h</string>
<key>UILaunchImageOrientation</key>
<string>Portrait</string>
<key>UILaunchImageSize</key>
<string>{414, 736}</string>
</dict>
<dict>
<key>UILaunchImageMinimumOSVersion</key>
<string>7.0</string>
<key>UILaunchImageName</key>
<string>Default-568h</string>
<key>UILaunchImageOrientation</key>
<string>Portrait</string>
<key>UILaunchImageSize</key>
<string>{320, 568}</string>
</dict>
 <dict>
  <key>UILaunchImageMinimumOSVersion</key>
  <string>6.0</string>
  <key>UILaunchImageName</key>
  <string>Default</string>
  <key>UILaunchImageOrientation</key>
  <string>Portrait</string>
  <key>UILaunchImageSize</key>
  <string>{320, 480}</string>

 </dict>
</array>
If you wish to support landscape images, add matching keys with Default-Landscape-???h filenames and specify the correct orientation and size.

Note that this is not Apple's preferred way of indicating support for the screen sizes. Their Launch Images doc says:

You use a launch XIB or storyboard file to indicate that your app runs on iPhone 6 Plus or iPhone 6.

which requires you to create a Storyboard or XIB using size classes. More on how to do that in this post, or head back to that StackOverflow post!

p.s. this iPhone 6 Screens Demystified post by PaintCode is awesome!

UPDATED: @jamesmontemagno informs me that you need to add the original 320x480 into the plist too, so I've added to the example above. 

Sunday, 29 September 2013

Android TextToSpeech API with Xamarin: it talks too!

A recent post covered Apple's new text-to-speech API in iOS 7, but forgot to mention that Android has actually had this capability for a while! It's really easy to add text-to-speech to a Xamarin.Android app: just implement TextToSpeech.IOnInitListener (which is a single method: OnInit) then create a new TextToSpeech instance:

speaker = new TextToSpeech (this, this);

and call Speak:

void Speak(string text) {
   var p = new Dictionary ();
   speaker.Speak (text, QueueMode.Flush, p);
}

The TaskyPro sample code has been updated so that both the iOS and Android apps have a Speak button. The Android app looks like this:

Check out this cool TtsSetup sample for Xamarin (via StackOverflow) for more details on how to customize the Android TextToSpeech API.

Friday, 27 September 2013

Built-in Barcode Scanning with iOS7 and Xamarin: MonkeyScan!

Another new iOS 7 feature is built-in support for barcode-scanning via the AVFoundation AVCaptureDevice API. Back in 2012 I threw together MonkeyScan using Windows Azure Services and the ZXing barcode scanning library. For iOS 7 I've updated the code to use the Azure Mobile Services Component and the new iOS 7 barcode scanning API instead.

The app looks like this when scanning a PassKit pass:

The code that sets up an AVCaptureDevice for 'metadata capture' (as opposed to capturing an image or video, I guess :) is shown below:

bool SetupCaptureSession () {
   session = new AVCaptureSession();
   AVCaptureDevice device = 
      AVCaptureDevice.DefaultDeviceWithMediaType(AVMediaType.Video);
   NSError error = null;
   AVCaptureDeviceInput input = 
      AVCaptureDeviceInput.FromDevice(device, out error);

   if (input == null)
      Console.WriteLine("Error: " + error); 
   else
      session.AddInput(input);

   AVCaptureMetadataOutput output = new AVCaptureMetadataOutput();
   var dg = new CaptureDelegate(this);
   output.SetDelegate(dg, MonoTouch.CoreFoundation.DispatchQueue.MainQueue);
   session.AddOutput(output); // MUST add output before setting metadata types!

   output.MetadataObjectTypes = new NSString[] 
      {AVMetadataObject.TypeQRCode, AVMetadataObject.TypeAztecCode};

   AVCaptureVideoPreviewLayer previewLayer = new AVCaptureVideoPreviewLayer(session);
   previewLayer.Frame = new RectangleF(0, 0, 320, 290);
   previewLayer.VideoGravity = AVLayerVideoGravity.ResizeAspectFill.ToString();
   View.Layer.AddSublayer (previewLayer);

   session.StartRunning();
   return true;
}

You can specify specific barcodes to recognize or use output.AvailableMetadataObjectTypes to process all supported types.

...and it speaks!
Since the app now requires iOS 7, it can also use the new AVSpeechSynthesizer to speak the scan result as well (see previous post).

if (valid && !reentry) {
   View.BackgroundColor = UIColor.Green;
   Speak ("Please enter");
} else if (valid && reentry) {
   View.BackgroundColor = UIColor.Orange;
   Speak ("Welcome back");
} else {
   View.BackgroundColor = UIColor.Red;
   Speak ("Denied!");
}

The MonkeyScan github repo has been updated with this code.

Thursday, 26 September 2013

iOS SpeechSynthesizer API with Xamarin: it talks!

Mike posted a neat code example today on adding the new iOS 7 AVSpeechSynthensizer API to a Xamarin app.

It's so easy, I added speech synthesis to the this TaskBoard to-do list example in about 5 lines of code. Now the app can read the to-do item back to you :) just by adding this code:

if (UIDevice.CurrentDevice.CheckSystemVersion (7, 0)) {
   SpeakButton.TouchUpInside += (sender, e) => {    // requires iOS 7
      Speak (TitleText.Text + ". " + NotesText.Text);
   };
}

and

void Speak (string text) {
   var speechSynthesizer = new AVSpeechSynthesizer ();

   var speechUtterance = new AVSpeechUtterance (text) {
      Rate = AVSpeechUtterance.MaximumSpeechRate/4,
      Voice = AVSpeechSynthesisVoice.FromLanguage ("en-AU"),
      Volume = 0.5f,
      PitchMultiplier = 1.0f
   };

   speechSynthesizer.SpeakUtterance (speechUtterance);
}

The UI now looks like this: touch the Speak button to hear the text read back to you.

Wednesday, 10 July 2013

New Dropbox API one day, on Xamarin the next

Long-time Xamarin customers know that there is a history of delivering updates same day when the native platforms (iOS and Android, for example) are upgraded. Today there was another little surprise - the new Dropbox Datastore API that was announced at DBX yesterday was made available via a Xamarin Component today!

Think of it as a cross-platform iCloud-like key-value store ~ same kind of stuff you can do with Parse or even Azure Mobile Services.

Check out the Xamarin Blog for all the details and a cute sample app called MonkeyBox.

But wait, there's more!
In the past I've posted about porting a small "To Do List" application to various different platforms, including Azure (iOS, Android, Mac and more) twice as well as an iCloud version for iOS.

Here's the same basic code using the new Dropbox Datastore API (just iOS, for now...):

Here's a direct link to the code on github... to use just download the solution (which includes the Xamarin Dropbox Component) and:

  1. Visit the Dropbox App Console to get your access credentials set-up.
  2. Add the App key and App secret to the AppDelegate.cs in the project.
  3. Add a Custom URL Type to the advanced Info.plist settings (replacing the identifier and also YOUR_APP_KEY with the correct credential value) like this

When the app is up-and-running, you can 'browse datastores' from the Dropbox App Console and see the data update on the server in real-time!

In only a few lines of code you can use a cloud-based data store simply and easily, across multiple platforms and devices! Load up the app on a couple of iOS devices (and/or the iOS Simulator) and watch the magic in action :)

Tuesday, 15 January 2013

Xamarin for Java Developers

Last night I was given the opportunity to present Xamarin's Mono for Android to the East Bay Google Developer Group. It was a lot of fun, with plenty of the audience asking a lot of great questions and generally being curious about how C# can be used to build Android apps. Here are the slides from the talk - please drop me a line with any feedback or questions!

One topical question was "what does using Xamarin and C# offer existing Android Java developers?". I have a couple of thoughts which are listed below (in no particular order):

Learn a new language!
The days of specializing in a single language throughout your career (or even throughout the year!) are over. Once upon a time it was COBOL all the way down, and you could argue that it's still enough to just know C/C++. But it's no longer the norm ~ developers want to grow and learn, and use the best tool for the job (whether it's Perl, PHP, Java, Ruby, C#, F#, Javascript, TypeScript, Go, or whatever).

It can be daunting though, to start from scratch and learn a new IDE, framework and syntax - which is why I think C# is a great progression for Java devs. The two languages are obviously related - there is a lot of common syntax and equivalent keywords that make it easy to get proficient quickly. They're both strongly typed, so the IDE and compiler can really help you learn. Then once you know the C# basics, a whole world of new APIs open up to you: LINQ, the .NET framework's serialization and web service features, Parallel Task Library and async support, reactive extensions, and more.

It also introduces you to another IDE (Visual Studio is a great tool, as is Xamarin's free MonoDevelop IDE), which in turn can encourage you to further explore other languages and platforms (suddenly it's a small leap to work on Windows Phone, or try F#). Using the free trial you can easily get productive in C# and Android development without any up-front cost: you can run your apps on the Android emulator, and choose to work on either Windows or Mac with MonoDevelop.

Cross-platform development!
There are a lot of Java developers who are already proficient with the Android SDK and have published successful apps to Google Play, or Amazon, or Samsung app stores; and there's another group of corporate/enterprise developers building apps for internal/extranet use that were designed for Android. When these developers ask "why Xamarin?", I never say "throw away everything you've done and re-write in C#!" -- that'd be crazy ;-)

But what happens when you want to take these apps cross-platform, either to make more money on the iOS and Mac App Stores or to better support a corporate BYOD policy which means your internal apps need to run on iOS and Windows? You can choose to learn Objective-C to write for iOS and C# for Windows... or take the opportunity provided by Xamarin to use C# for all the non-Java platforms and reduce the amount of code you have to support and re-write by half!

Following on from the first point, I think learning C# is a much smaller leap for a Java developer than Objective-C; and once you've done so you can work on either iOS apps using Xamarin's MonoTouch or Windows Phone, Windows 8 and Windows RT tablet apps! You might like C# so much that you do go back and re-write your Java, or at least start building a hybrid that shares some Java and C# code...

Xamarin does Android well too :)
If Java developers do fall in love with C# then they also find that Xamarin does Android just as well as anyone (probably better!). Our MonoDevelop IDE (and our integration with Visual Studio) means you get an awesome coding experience (autocomplete/intellisense/code completion, debugging, refactoring, source control integration, etc) as well as a drag-and-drop UI designer. You be the judge of whether it's a better experience than Eclipse :)

Fin
In summary, why not? As a Java developer you have a lot to gain and nothing to lose by giving C# a try. A whole world of new platforms, tools and frameworks become available with a very low barrier to entry. Try it - you just might like it ;-)

Thursday, 3 January 2013

Localizing iOS6 Storyboards with MonoTouch

Localization and internationalization of XIB and Storyboard files has historically been a very manual process. Typically these file types would be duplicated in each 'language directory' (*.lproj) and then the text and layout tweaked independently by each translator. Changes to the actual Storyboard or XIBs would need to be manually propagated across all the 'language copies'.

In iOS6 Apple introduced a new concept - Base Localization - which you can read about in their documentation on Internationalizing Your App. Your project can contain a 'special' Base.lproj directory where the Storyboard files are located, and then a corresponding *.strings file (whose filename matches the Storyboard's) in each language directory with the translations.

There is a small sample showing how this works with MonoTouch - TaskyL10nStoryboard on github. There is no IDE support currently, but you can easily create the Base.lproj directory manually in MonoDevelop and everything works as expected. Here's a screenshot of the project structure:

then inside the Storyboard itself you need to identify the controls you wish to localize. Click on a control to discover its Object ID, and shown in this screenshot:

Using the Object IDs from the Storyboard file, we can translate the display values for various properties (including text, placeholders and others) in the MainStoryboard.strings file in each language directory, like this:
"SXg-TT-IwM.placeholder" = "nombre de la tarea";
"Pqa-aa-ury.placeholder"= "otra información de tarea";
"zwR-D9-hM1.text" = "Detalles de la tarea";
"bAM-2j-Rzw.text" = "Notas";
"NF3-h8-xmR.text" = "Completo";
"MWt-Ya-pMf.normalTitle" = "Guardar";
"IGr-pR-05L.normalTitle" = "Eliminar";
Using the Object ID and property as the localization key is quite different to Apple's previous guidance on localization, where the key is typically the base-language's actual displayable value.

Here's the localized Storyboard, in Japanese:


What about layout?
Strings can often be very different lengths in different languages. When you used a different Storyboard or XIB for each language then the control sizes could be manually adjusted to fit. When using Base Localization you should use Apple's new constraint-based layout to handle these size differences.

What about iOS5 and earlier?
This method only works on iOS6. To localize text on earlier versions of iOS you will have to duplicate your Storyboards and XIBs for each language, or create outlets for all the controls and set their localized text values in code using NSBundle.MainBundle.LocalizedString().
There is another localized sample - TaskyL10n - which shows how to localize text elements directly and uses MonoTouch.Dialog.