Sunday 7 November 2010

Conf mobile schedule for TechEd Berlin & Øredev

Europe is awash with conference attendees this week - for TechEd Berlin and Øredev.

If you are attending either conference, you might want to download Conf to your iPhone or Windows Phone 7 (no Android for now, but coming...).

One warning for Øredev - the 'unusual' session starting times (eg. 10 after the hour) were not catered for in the code, so the "up next" algorithm doesn't really work. To be fixed in the next release!


Hopefully no such issues occur with the TechEd Europe schedule, bought to you by the power of OData!

If you're reading this, you must be interested in these conferences, so you probably want to know about these other mobile schedule apps too*:
* DISCLAIMER: I had nothing to do with either of these apps - just mentioning them FYI...

Tuesday 26 October 2010

Conf for PDC10 on Windows Phone 7

A first-cut of the PDC10 schedule can now be downloaded for the Windows Phone 7 version of Conf - now available on Marketplace (Zune link).

To download new conference data in Conf
  • Start on the first panel of the Panorama
  • Scroll down to other conferences... and touch Download more...
  • When the list downloads from the server, touch PDC10
  • PDC10 should appear in the list - if not, switch between the conferences until it does :-s
This is what the app looks like with PDC10 data loaded:

The iPhone version of Conf is currently awaiting AppStore approval - fingers crossed for Thursday!

Thursday 14 October 2010

MonoTouch & WindowsPhone7: indexed lists

One interesting aspect of building cross-platform apps is how to adopt the 'standard' UI elements so that each app looks 'native'. A basic iPhone/MonoTouch and WindowsPhone7 application was introduced in a previous post. Each app uses the 'default' list representation.

This post is about making those apps easier to use, adding each platform's default "list index" to help select from long, sorted lists. The images below hardly need captions:
  • on the left is the iPhone app with alphabetic index down the right side of the screen
  • on the right is the WindowsPhone7 app showing the alphabet tiles 'in' the list, and the grid that is displayed when you touch one of those tiles

Implementing the two different solutions highlights the difference in the two platforms (referring of course to C#/MonoTouch on the iPhone, and C#/Silverlight on the WindowsPhone7). Get the complete code from github - the main changes for each platform are highlighted below:

iPhone (MonoTouch) UITableView sections

The following code was added to the UITableViewSource subclass to break up the list into sections, identify the section labels and wire up the alphabetic navigation. The GetCell and RowSelected methods also required a minor change.

List<string> sectionTitles;
Dictionary<int, <restaurant>> sectionElements = new Dictionary<int,restaurant>>();
public TableViewSource (List<restaurant> list, MainViewController controller)
{
   this.list = list;
   mvc = controller;
   sectionTitles = (from r in list
            orderby r.StartsWith
            select r.StartsWith).Distinct().ToList();
   foreach (var restaurant in list)
   {   // group elements together into 'alphabet'
      int sectionNumber = sectionTitles.IndexOf(restaurant.Name[0].ToString());
      if (sectionElements.ContainsKey(sectionNumber))
         sectionElements[sectionNumber].Add(restaurant);
      else
         sectionElements.Add(sectionNumber, new List<restaurant> {restaurant});
   }
}
public override int NumberOfSections (UITableView tableView)
{
   return sectionTitles.Count;
}
public override string TitleForHeader (UITableView tableView, int section)
{
   return sectionTitles[section];
}
public override string[] SectionIndexTitles (UITableView tableView)
{
   return sectionTitles.ToArray();
}
public override int RowsInSection (UITableView tableview, int section)
{
   return sectionElements[section].Count(); //list.Count;
}


Windows Phone 7 'quick jump grid'

Although you'll see this kind of navigation in the 'built-in' applications, it isn't actually part of the default SDK. Thankfully Kevin Marshall has posted a quick jump grid sample which has been integrated into the RestGuide app - just add the relevant Assembly References then update the XAML to use the QuickJumpGrid (don't forget to add the relevant xmlns: declarations)

<cc:QuickJumpGrid DataSource="{Binding}"
      IsAlphaNumeric="True"
      Margin="12,0,0,0"
      SelectionChanged="MainListBox_SelectionChanged"
      x:Name="MainListBox"
      OverlayTileBackground="#8CBF26">
    <cc:QuickJumpGrid.QuickJumpGridSelector>
        <local:RestaurantNameSelector />
    </cc:QuickJumpGrid.QuickJumpGridSelector>
    <cc:QuickJumpGrid.ItemTemplate>
        <DataTemplate>
           <StackPanel Margin="0,0,0,17" Width="432">
               <TextBlock Text="{Binding Name}" TextWrapping="Wrap" Style="{StaticResource PhoneTextExtraLargeStyle}"/>
               <TextBlock Text="{Binding Cuisine}" TextWrapping="Wrap" Margin="12,-6,12,0" Style="{StaticResource PhoneTextSubtleStyle}"/>
           </StackPanel>
        </DataTemplate>
    </cc:QuickJumpGrid.ItemTemplate>
</cc:QuickJumpGrid>

and implement this 'helper' class (which is referenced from the XAML)

namespace RestGuide
{
    public class RestaurantNameSelector : IQuickJumpGridSelector
    {
        public Func<object, IComparable> GetGroupBySelector()
        {
            return (p) => ((Restaurant)p).Name.FirstOrDefault();
        }
        public Func<object, string> GetOrderByKeySelector()
        {
            return (p) => ((Restaurant)p).Name;
        }
        public Func<object, string> GetThenByKeySelector()
        {
            return (p) => (string.Empty);
        }
    }
}

Thursday 30 September 2010

MonoTouch... CATiledLayer example (like DeepZoom/multi-scale-image)

UPDATE 2-Oct-02: Thanks to Miguel's assistance the NPhotoScroller code on github is now working!

The CORRECT port of this Objective-C snippet...

+ (Class)layerClass {
  return [CATiledLayer class];
}


...is this c# (requires using MonoTouch.ObjCRuntime;)

[Export ("layerClass")]
public static Class LayerClass () {
  return new Class (typeof (CATiledLayer));
}


and not the dodgy hack I came up with below...


Original Post:
Normally code posted on this blog actually works (or close to it...) but today I have a half-done port of an Objective-C sample that I just can't seem to finish off :-(

The idea was to port Apple's PhotoScroller sample, which demonstrates how to use the CATiledLayer, to MonoTouch.

The work-in-progress is on github: NPhotoScroller*... however it isn't quite finished and I'm hoping someone will point out what is missing.

If you download the sample (and grab the images from Apple), the my MonoTouch port looks like this:

It seems to be working, since the image is being successfully drawn using tiles BUT there are too many tiles for this zoom level. It should look like the image below (ie. 4 tiles) but I can only get that effect by hardcoding TilingView.cs::line 96 to a specific zoom level of 0.125

Using a different hardcoded zoom level of 0.25 results in this output, so the tiles are 'definitely kinda working'...


The problem? Zooming is totally broken - any attempt to pinch/zoom on these images breaks. TilingView.cs::line 95 ALWAYS returns a scale of 1 - it never changes. ImageScrollView.cs::line 157 this.ZoomScale = this.MinimumZoomScale seems to have no effect: no matter what the MinimumZoomScale is (eg. 0.08), ZoomScale is always 1 and the context.GetCTM() CGAffineTransform never reflects a change in zoom level.

If you switch from 'tiled' to 'whole' images (PhotoViewController.cs::line 63 useTiledImage = false;) then zooming works perfectly (if greedily from a memory perspective). I would love to hear any suggestions!!

Aside: I did have one minor issue with the port... what to do with this code in TilingView.m


+ (Class)layerClass {
return [CATiledLayer class];
}


It's been ported as the following in TilingView.cs but I could be way off base...


private CATiledLayer __layer;
public override CALayer Layer {get
{ // set in ctor
return __layer;
}
}


...HELP?!

* NOTE: If you download the sample from github, you MUST also download Apple's original sample to get their test image files.

Saturday 25 September 2010

MonoTouch meet WindowsPhone7

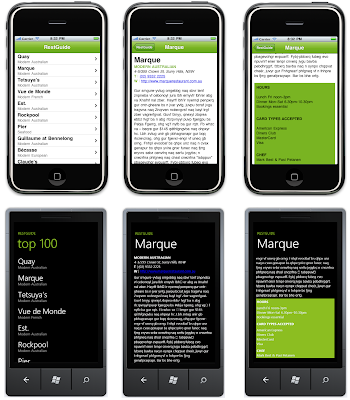
This is a very basic example of how you can share data and code between the iPhone platform (using MonoTouch) and recently RTM'd Windows Phone 7.

iPhone and Windows Phone 7 screenshots : click to enlarge

The code is available on github... notice that the source data (restaurants.xml file) and class file (Objects.cs) are identical on both platforms, as is the XmlSerialization code that parses the data into memory for display.

You will see there is a lot more 'user code' in the MonoTouch project for iPhone - this is due to the laborious way that UITableViews must be coded*; whereas the WP7's Silverlight heritage allows some very neat databinding scenarios.

* the excellent MonoTouch.Dialog project significantly reduces this code overhead on MonoTouch - definitely give it a try!

...now I just need to put the MonoDroid version together... :-)

Wednesday 4 August 2010

UIGlassButton Generator in MonoTouch

Sometimes the default look of iOS controls (such as UIButton) is a little 'flat'. Apple themselves sometimes use a very pretty 'glass button' effect, which could be achieved (apparently, I'm paraphrasing here) using an undocumented UIGlassButton class. You can read more about this in the source links for this sample:
Anyway... Martin did a great job porting this approach to MonoTouch, creating a GlassButton.dll wrapper as part of a sample project that allows you to create great-looking PNG-image-glass-buttons to incorporate into your iOS projects. The only thing missing was a double-resolution version for my new iPhone4's Retina Display, so that's what I've added to this github project: GlassButtonGenerator.

How it works:
  1. Edit the string constants for button text and filename
  2. Edit the filename which is used in the path to save the output
  3. Run the app in the Simulator and press the [Generate Glass Button] button
  4. Grab the images that are saved to your Desktop
  5. Use the images in your iOS app in UIButton controls
Here is the 'output' when you are running it in the simulator (the button images should be saved to your Desktop):

If you are then wondering what to do with the two images, check out Miguel's post on Building apps for the Retina Display. Basically you should use UIImage.FromBundle to load the image and ensure that the 'regular' and 'retina' versions have the same filename (with the 'retina' version having a suffix @2x).

For the code below, the /Images/ folder has four images: BuyGlass.png, BuyGlass@2x.png, CancelGlass.png, CancelGlass@2x.png (where the @2x images have double the height & width dimensions of the base image)...
buyButton.SetImage(
     UIImage.FromBundle("Images/BuyGlass.png")
   , UIControlState.Normal);
cancelButton.SetImage(
     UIImage.FromBundle("Images/CancelGlass.png")
   , UIControlState.Normal);

Don't forget to make the Build Action: Content for your image files! And remember, DON'T use UIGlassButton in your apps directly - generate the images and include them.

UPDATE (May 2011): Miguel has posted a code-based glass button implementation which you might prefer to this pre-generated image one. See Glass button for iPhone and the code on github.

Friday 23 July 2010

Drawing on Maps with MonoTouch

iOS4 introduced new features like MKOverlay to help draw lines/routes and shapes/polygons on the MKMapView control, however it has always been possible to add these features to maps in iOS3.

Two (Objective-C) examples of displaying geometric shapes on MKMapView in iOS3 are:
...it is these examples that I've ported to MonoTouch (as a Universal app: iPhone and iPad). You can grab the code from github project MapStuff and see some screenshots below:

I put together a class diagram to try and explain how they work (the classes shown are from the 2nd example, which allows you to draw your own shape).

Please remember all the hard work here has been done by the original authors. All credit goes to them. Any bugs in the MonoTouch code are mine... let me know if you find any.

iOS4 examples to follow...

Sunday 18 July 2010

More MonoTouch Machine-translation Madness!

In addition to the recent dodgy Spanish localization, my TweetStation fork now has dodgy French, Japanese, German and Italian translations (courtesy of the Microsoft Translator API that was introduced at MIX10). Here's how they look:


The following two code snippets were added to ngenstrings so that once the text has been extracted from TweetStation, it is automatically translated and written to .strings files ready for inclusion in the correctly-named .lproj folders (this code hasn't been committed to github - but it should be easy to add to your local copy).

add code to the end of MainClass.Main
string[] languages = new string[]{"fr","ja","it","de"};
foreach (var language in languages)
{
   foreach (var table in tables.Values)
   {
      foreach (LocalizedString locstring in table.Values)
      {
         locstring.Value = Translate(locstring.Key, language);
      }
      table.WriteStringsFile(assemblyName, outputFormat, language);
   }
}

add method to MainClass
//http://msdn.microsoft.com/en-us/library/ff512421.aspx
static string Translate (string text, string toLanguageCode)
{
   string appId = "REGISTER_AND_INSERT_YOUR_APPID";
   string translation = text;
   text = text.Replace(" ", "%20").Replace("&", "").Replace("#","%3F");

   string detectUri = "http://api.microsofttranslator.com/v2/Http.svc/Translate?appId=" + appId +
  "&text=" + text + "&from=en&to=" + toLanguageCode;
   Console.WriteLine(detectUri);
   try {
      System.Net.HttpWebRequest httpWebRequest = (System.Net.HttpWebRequest)System.Net.WebRequest.Create(detectUri);
      System.Net.WebResponse resp = httpWebRequest.GetResponse();
      Stream strm = resp.GetResponseStream();
      StreamReader reader = new System.IO.StreamReader(strm);
      translation = reader.ReadToEnd();
   }
   catch (Exception e)
   {
      Console.Write("Translation failed for " + text + " - " + e.Message);
   }
   return translation;
}

Hopefully that gives you some ideas (or inspiration) on how to increase the market for your apps across the world. Remember that machine-translation is NOT a substitute for a professional human translation, however it can be useful to test your application's ability to handle and display different languages (eg. the size of the strings, etc).

Friday 16 July 2010

TwitEstaçion: MonoTouch TweetStation en español

If you are a MonoTouch developer then you should already be familiar with the two subjects of this post:
It just so happens that Chapter 12 - Localizing for an International Audience of the book introduces a small utility called ngenstrings that helps you to translate your application into other languages. Today I updated ngenstrings to use the latest Mono.Cecil version, and to test it out I decided to have a go at localizing TweetStation into Spanish. You can download the Localizable.strings file that was created (and translated courtesy of Bing). Here's a screenshot showing where it fits into the solution:
...and here are a couple of screenshots showing TwitEstaçion in action ;-)

NOTE: Miguel had already made a good start building an internationalized app - many of his strings were wrapped in a Locale.GetText() method which was easy for me to work with. None of his code needed to change except for Locale.Get() and Locale.Format() to add NSBundle.MainBundle.LocalizedString(str,"");
NOTE2: this was a MACHINE TRANSLATION - of course you would arrange for a real person to translate your apps before taking them to the AppStore!
NOTE3: I have not translated 100% of Miguel's app - this is for demonstration purposes at the moment.
NOTE4: It's called TwitEstaçion because "TweetEstaçion" is too long for the iPhone home screen, and gets shortened unreadably. I don't speak Spanish so who knows if that makes any sense at all!

UPDATE: a few more screenshots... (again, apologies for the machine translation:)
UPDATE2: localized code forked from TweetStation main now available on github.

Friday 9 July 2010

MonoTouch port of TDBadgedCell

I recently wanted to add an 'item count' to a UITableView in one of my iPhone/iPad projects and thought it would be nice to match the grey/encircled 'badge' used in the Mail application.

Happily,  I found (via The Unofficial Apple Weblog) that Tim Davies had the same idea and already done the hard work, albeit in Objective-C. Tim's code for TDBadgedCell is on github (you can help him out and donate, too), as is the MonoTouch/C# port: TDBadgedCellSharp. Both produce the same output (shown below)

The important stuff (TDBadgeView and TDBadgeCell) is in TDBadgedCell.cs - the rest of the project is purely for demonstration purposes.

Here's a very simple example of how to use the badged cell (warning: doesn't show DequeueReusableCell which you would normally use in the GetCell method)...

public override UITableViewCell GetCell 
   (UITableView tableView, NSIndexPath indexPath)
{
   TDBadgedCell cell = new TDBadgedCell (UITableViewCellStyle.Subtitle, "Cell");
   cell.TextLabel.Text = contents[indexPath.Row].Title;
   cell.TextLabel.Font = UIFont.BoldSystemFontOfSize (14);

   cell.DetailTextLabel.Text = contents[indexPath.Row].Detail;
   cell.DetailTextLabel.Font = UIFont.SystemFontOfSize (13);

   cell.Accessory = UITableViewCellAccessory.DisclosureIndicator;
   cell.BadgeNumber = Convert.ToInt32 (contents[indexPath.Row].Badge);

   if (indexPath.Row == 1)
      cell.BadgeColor = UIColor.FromRGBA (1.000f, 0.397f, 0.419f, 1.000f);
   if (indexPath.Row == 2)
      cell.BadgeColor = UIColor.FromWhiteAlpha (0.783f, 1.000f);
   return cell;
}

Thanks Tim!

..and finally, if you didn't notice the cover at the top of this page or seen the tweets, "my" book (and Wally, Chris, Martin & Rory's :) is now available from Amazon (and other locations, in paper or PDF)!

Monday 3 May 2010

iPad 'infinite scrolling' with MonoTouch

Tonights exercise proves that sometimes it's worth taking time out to 'design' a chunk of code before writing it. Here's the "design"... can you see what it's trying to do?


Okay, I'll tell you: I'm trying to create an 'infinite' (well, just a configurable number) of scrollable pages that are rendered with UIWebView controls. I want to use the minimum number of controls for performance and memory but I also want a nice scrolling experience where the next and previous pages are aways pre-loaded. As you scroll left and right, the UIWebViews are shuffled around (X-coordinates only) to create an effect similar to the Time magazine 'app'.

Amazingly it worked out pretty quickly - here are a couple of screens to "prove" that it scrolls left & right as expected. It's using a "CSS3" multi-column hack in the Html, but that's another story...


And here are the 'important bits' of the code. I'm not publishing the entire source right now - the app still has a long way to go - but you get the idea... I hope. I only had a brief look around for existing examples so if you've seen a better one, let me know!

// declarations
UIScrollView MyScrollView;
UIWebView[] WebViewArray = new UIWebView[3];
int[] WebViewHasPage = new int[]{0,1,2};
int NumberOfPages = 8; // news01.html .. news08.html
...
// ViewController ctor
var bounds = new RectangleF(0, 0, View.Bounds.Width, View.Bounds.Height);
MyScrollView = new UIScrollView(bounds);
RectangleF scrollFrame = MyScrollView.Frame; // start with screen size
scrollFrame.Width = PageWidth * NumberOfPages; // then make the content
MyScrollView.ContentSize = scrollFrame.Size; // 8 screens wide
MyScrollView.Scrolled += ScrollViewScrolled; // and attach event handler
for (int i = 0; i < 3; i++)
{ // lay out three web controls to shuffle around
webViewFrame.X = PageWidth * i;
WebViewArray[i] = new UIWebView(webViewFrame);
WebViewArray[i].ScalesPageToFit = false;
var u = NSUrl.FromFilename(basedir+"news0"+(i+1)+".html");
var r = new NSUrlRequest(u);
WebViewArray[i].LoadRequest(r);
MyScrollView.AddSubview (WebViewArray[i]);
}
...
// and the method that does the shuffling
private void ScrollViewScrolled (object sender, EventArgs e)
{
UIScrollView sv = (UIScrollView)sender;
double page = Math.Floor ((sv.ContentOffset.X - sv.Frame.Width / 2) / sv.Frame.Width) + 1;
int LastPage = CurrentPage;
int NewPage = CurrentPage;
if (sv.ContentOffset.X % PageWidth == 0) NewPage = (int)page; // moved pages!
if (NewPage >= 0 && NewPage < NumberOfPages)
{
pageControl.CurrentPage = NewPage;
CurrentPage = NewPage;
int updatePage = 0;
bool shouldMove = false;
if (NewPage > LastPage)
{// moving right
updatePage = NewPage + 1; shouldMove = true;
}
else if (NewPage < LastPage)
{// moving left
updatePage = CurrentPage - 1; shouldMove = true;
}
if (shouldMove & (updatePage >= 0) & (updatePage < NumberOfPages))
{
int webViewSlot = updatePage % 3;
if (WebViewHasPage[webViewSlot] == updatePage) return; // already has it
else WebViewHasPage[webViewSlot] = updatePage;
var url = NSUrl.FromFilename(BaseDirectory+"news0"+(updatePage+1)+".html");
var request = new NSUrlRequest(url);
WebViewArray[webViewSlot].LoadRequest(request);
var rect = new RectangleF (
WebViewArray[0].Frame.Width * updatePage
, WebViewArray[webViewSlot].Frame.Y
, WebViewArray[webViewSlot].Frame.Width
, WebViewArray[webViewSlot].Frame.Height);
WebViewArray[webViewSlot].Frame = rect;
}
}
else
{
Console.WriteLine ("Scrolled a little too far, to page " + page);
}
}

Tuesday 9 March 2010

Anatomy of a c# iPhone app (with MonoTouch)

Wow - it has been a long time since my last post... and with good reason ;)

Firstly I've been busily writing (along with Wally, Chris, Martin & Rory) for Wrox' upcoming Professional iPhone Programming with MonoTouch and .NET/C# which is available for pre-order on Amazon. If you are interested in developing for the iPhone using C# and the .NET Framework it should be a great addition to all the resources already out there on the web.


Secondly I've been working on an iPhone app for MIX10 in Las Vegas next week (with help from Chris, Miguel & Geoff). Whether you are heading to MIX or just curious about C# and MonoTouch on the iPhone, why not download and give it a try?

Since the MIX10.app was first 'announced' on twitter #MIX10 there have been a number of requests for the source code. Unfortunately the source isn't public at the moment, however that doesn't mean we can't talk about "how it works". To start with, the MIX10.app is based on two previous iPhone apps written in C# with MonoTouch, and whose source code is available:
If you have an Intel Mac (with Snow Leopard) then you can download both the Apple SDK and the MonoTouch trial version for free and get both these C# .NET examples running in the iPhone Simulator for yourself. To deploy on a real iPhone requires certificates and licences (from Apple and Novell/MonoTouch respectively).

MIX10.app
Here's the overall class diagram for the MIX10.app (with the views shown too). Even without seeing the code it's clear that the classes themselves are not overly complex (ie. few methods are required; and inheritance can be leveraged to share common functionality).


The MIX10.app also uses Miguel's MonoTouch.Dialog framwork and he's posted a snippet of code on gist.github which is responsible for this screen (on the left)


And he also posted this code which creates the 'My Schedule' view on the right. Pretty neat use of Linq, eh? I'm not sure I've seen such an expressive user-interface expressed in so few lines of code before...
public class FavoritesViewController : DialogViewController {
  public FavoritesViewController () : base (null) { }
  public override void ViewWillAppear (bool animated)
  {
    var favs = AppDelegate.UserData.GetFavoriteCodes();
    Root = new RootElement ("Favorites") {
      from s in AppDelegate.ConferenceData.Sessions
        where favs.Contains(s.Code)
        group s by s.Start into g
        orderby g.Key
        select new Section (MakeCaption ("", g.Key)) {
          from hs in g
            select (Element) new SessionElement (hs)
        }
    };
  }
}
The object model closely follows the data available from the api.visitmix.com site's OData and RSS feeds. These are plain vanilla C# objects which also run on the server to download and package the data for the iPhone - the object graph is serialized by a .NET application on Windows Server 2003, downloaded by the WebClient class on the iPhone (thanks to MonoTouch) and de-serialized ready for display. A perfect example of the cross-platform possibilities facilitated by MonoTouch and having the .NET framework available on both server and mobile device.


Finally, here's a quick overview of ALL the screens in the app.


...and if you're a Windows Phone Series 7 fan-in-the-making, it should be obvious that having a shared set of services and functionality in C# that can be deployed across iPhones with MonoTouch, and Silverlight/Windows Phone 7 with only UI code needing to be customized is a great way to achieve maximum reach for your apps. The MonoTouch Roadmap is also targetting a Q3 release of MonoDroid, so with a bit of imagination it isn't hard to see where the future of cross-mobile-device development is heading...

Friday 15 January 2010

MonoTouch MapKit.Delegate-precated

An update to MonoTouch (1.4.4) was released today with these changes/improvements (actually 1.4.5 was released a day later). One in particular caught my eye, since I've previously blogged about MapKit in MonoTouch.
MKMapView now has C# style events

So what does that mean? Basically the crafty team at Novell have turned the Apple SDK "pattern" of using a MKMapViewDelegate class to respond to "events" on its head, and instead exposed familiar .NET events on MKMapView itself. *

Here's a comparison of the 'old' and 'new' MKMapView class:


Here are two 'example' delegate methods that work in 1.4.4 (and .5). Firstly here's an example of wiring up one of the "new" events CalloutAccessoryControlTapped. NOTE the += used to attach the delegate to the event.
Map.CalloutAccessoryControlTapped += 
delegate(object sender, MKMapViewAccessoryTappedEventArgs e)
{
MyAnnotation myAnn = e.View.Annotation as MyAnnotation;
using (var alert = new UIAlertView (myAnn.Title,
myAnn.Subtitle + " clicked", null, "OK", null))
{
alert.Show();
}
};
The second example is probably the most common one - GetViewForAnnotation - which you will need to provide if you want to do any sort of customization of your pins/callouts. NOTE how it is assigned with an equals sign and has a return value!
Map.GetViewForAnnotation = delegate (MKMapView mapView, NSObject annotation) {
if (annotation is MKUserLocation) return null;
MyAnnotation myAnn = annotation as MyAnnotation;
var annView = mapView.DequeueReusableAnnotation ("pin");
if (annView == null) {
var pinView = new MKPinAnnotationView(myAnn, "pin");
pinView.AnimatesDrop = true;
pinView.CanShowCallout = true;
annView = pinView;
}
else
{
annView.Annotation = annotation;
}
return annView;
};

* imagine these are "air quotes" in this paragraph
p.s. This post has been updated since the comments below. The first two kinda don't make sense now... Thanks for the advice mdi.