Sunday, 23 September 2012

iOS 6 UIRefreshControl with MonoTouch

Another cute little new feature of iOS 6 is the built-in pull-to-refresh control - UIRefreshControl. It is really simple to wire up with Xamarin on a regular UITableViewController or with MonoTouch.Dialog.

In case you're unfamiliar with it, this is how the new control looks:

To implement:

  • Assign the RefreshControl property of a UITableViewController to a new instance of the control, eg. RefreshControl = new UIRefreshControl();
  • Create a handler for the control's ValueChanged event, eg RefreshControl.ValueChanged += HandleValueChanged;. In this handler your code will do whatever is required to refresh the data when the user pulls down enough to trigger the event.
  • In HandleValueChanged code, once you have refreshed the table, call the EndRefreshing method of the control to stop it spinning. Your refresh code was probably not running on the main thread, in which case you'll probably want to use InvokeOnMainThread like this: InvokeOnMainThread (() => {RefreshControl.EndRefreshing (); });

There are additional features you may use:

  • BeginRefreshing - call this method from your code if you start a refresh operation from code (eg. on a timer or in response to some other event). This sets the UI of the control to indicate there is already a refresh in progress.
  • Refreshing - whether there is already a refresh in progress.
  • AttributedTitle - optional text that appears under the refresh control.
  • TintColor - customize the appearance of the control to match your application's theme.

Refer to Apple's UIRefreshControl doc for additional info.

UPDATE: What about iOS 5?

This above example will not work on earlier versions of iOS - the UIRefreshControl class does not exist, nor does the RefreshControl property on UITableViewController. To get around this problem, the following code does a system check and falls back to an old-fashioned navbarbutton in earlier versions of iOS:

if (UIDevice.CurrentDevice.CheckSystemVersion (6,0)) {
    // UIRefreshControl iOS6
    RefreshControl = new UIRefreshControl();
    RefreshControl.ValueChanged += (sender, e) => { Refresh(); };
} else {
    // old style refresh button
    NavigationItem.SetRightBarButtonItem (new UIBarButtonItem (UIBarButtonSystemItem.Refresh), false);
    NavigationItem.RightBarButtonItem.Clicked += (sender, e) => { Refresh(); };
}

The Refresh method should contain the code that actually gets new data and updates the UITableView. That method should contain a similar if (CheckSystemVersion(6,0)) clause that wraps the call to the RefreshControl.EndRefreshing method on the main thread. Users on older operating systems will see this:

Wednesday, 19 September 2012

iOS 6 released, supported by Xamarin

It would be hard to miss the news that Apple is launching their new iPhone 5 this week, and has also released the final version of iOS 6. What's also great is that Xamarin supports iOS 6 too, on release day! There's already plenty of documentation, using C# with StoreKit, PassKit, EventKit, UIKit changes and more.

Of course there are heaps of little additions as well as those big ones, including a raft of new Core Image Filters to play with. For those working on the next Instagram (isn't everyone ;-), here's a preview of a couple of them:


(Posterize, Bloom, Invert, Perspective and Vortex)

For more information, review the Introduction to CoreImage in iOS 5 and the additional sample code for iOS 6. You might also like Apple's CoreImage Filter Reference.

Thursday, 13 September 2012

Microsoft's Azure Mobile Services... and WP7... and Mac

So far, Azure Mobile Services have been added to MonoTouch and Mono for Android (as well as Microsoft's getting started sample for Windows 8).
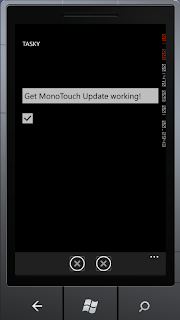
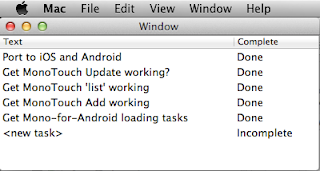
To complete the 'set', I ported the MonoTouch code to MacOSX using the free, open-source MonoMac AND used @kenegozi's 'unofficial' client to munge Azure Mobile Services into our existing Tasky sample on WP7.

These aren't production-quality implementations, mind you, just a couple of quick hacks to illustrate the beauty and simplicity of having C# and the .NET framework available across all these platforms. Oh, and also show the beauty of Azure Mobile Services :-)
You can grab the code for all of these from TaskCloud/Azure on github. You'll need to sign up for the Azure trial and follow the instructions to set up the Todo list tutorial.
Screenshots
Here's how the WP7 and MonoMac versions look:

Saturday, 1 September 2012

Microsoft's Azure Mobile Services... and Mono-for-Android

Yesterday's post introduced a quick implementation of Microsoft's Azure Mobile Services using MonoTouch to build an iOS app.
The WebClient and Json handling was easily refactored into a single class - AzureWebService - which was then added to the existing Android version of the Tasky sample... and now we have the same Azure Mobile Service being access by three platform clients: Windows 8, iOS and Android all with C# (and the iOS and Android apps sharing the service client code).

Additional features have also been added to AzureWebService to allow deletion of tasks. The Android app source is on github and it looks like this (delete has been added to the iOS app too):

Here is a discussion of how the API was reverse-engineered with Fiddler. The REST endpoints that TaskyAzure accesses are:

GET /tables/TodoItem

GET /tables/TodoItem/?$filter=(id%20eq%20{0})

PATCH /tables/TodoItem/{id}
{"id":1,"text":"updated task text","complete":false}

POST /tables/TodoItem
{"text":"new task text","complete":false}

DELETE /tables/TodoItem/{id}

Finally, only a few small updates were required in the Windows 8 example prevent the completed tasks from disappearing and instead make use of the checkbox in a more natural way:

Now all three apps are reading and writing to the same Azure data store! Can't wait for the official cross-platform APIs :-)

Friday, 31 August 2012

Microsoft's Azure Mobile Services... and MonoTouch

Microsoft only recently announced a cool new addition to the Azure product offering: Mobile Services. They have done a great job at providing a getting started tutorial that gives you a working Windows 8 app in about 5 minutes (seriously, it's fast and easy).

Azure Mobile Services consist of an underlying REST API, so it didn't take long for someone (Chris Risner :-) to put a simple iOS client together. That was all the inspiration required to get it working with MonoTouch.

Actually there is already a MonoTouch todo-list example called Tasky and it has previously been adapted to use Apple's iCloud storage.

The finished code for TaskyAzure borrows heavily from the existing Tasky samples (eg. it uses MonoTouch.Dialog), and really only borrows the REST API urls and Json from Chris' post. I might be biased, but the C# code looks a lot simpler to me :-)
Visit github for the TaskyAzure code. The app looks like this:

And just to prove that the Windows 8 app and the MonoTouch app are both writing to the same Azure database, here is a screenshot of the Azure Management Portal showing the data storage:
Azure Mobile Services looks pretty interesting - look forward to seeing the official cross-platform APIs :-)

UPDATE: to try the code follow the Microsoft's instructions, including creating a free trial account. Once your Azure Mobile Service has been created, configure the app by updating the constants in the AzureWebService.cs class:

static string subdomain = "xxxxxx"; // your azure subdomain
static string MobileServiceAppId = "xxxxxx"; // your application key

Thursday, 23 August 2012

In-app purchase vulnerability & MonoTouch

Earlier this year (around July) Apple announced that a vulnerability had been discovered in the in-app purchasing mechanism, which they discuss here. They provide some Objective-C code which:

  • Checks the information returned matches the information in the SKPayment
  • Checks that new transactions have a unique transaction ID
  • Verifies the SSL certificate
  • Verifies the receipt's signature

I've started a port of that code to MonoTouch, so far it only performs the first two mitigation steps. The VerificationController c# class is a gist.

Adding this code to a simple in-app purchase implementation would turn something like this:

into something like this:

where there is now an additional web request round-trip in your purchase code, plus a pile of comparisons to see whether the the StoreKit receipt matches the one you requested from iTunes directly. It also stores a list of every transaction ID in NSUserDefaults that is used to identify duplicates (which is an indication that the responses are being faked).

WARNING: the c# port currently only performs rudimentary checks comparing the receipt returned by StoreKit to one you've attempted to independently verify with iTunes. Without the SSL certificate and signature checks your code will still be vulnerable to sophisticated hacks on the DNS config to re-route requests and fake the responses. Please consider this a starting point for improving the security of your in-app purchase code.

NOTE: Apple says this vulnerability will be addressed in a future version of the operating system!

Friday, 17 August 2012

Image Metadata with MonoTouch

Developers frequently want to know how to extract metadata from an image file on iOS using MonoTouch. One alternative is to use MonoTouch.ImageIO.CGImageSource to query the image (without even having to load it into memory).

Here is an example on gist that shows how to use the CGImageSource class, and a screenshot of how it looks (you'll have to add your own image to the project):

The key lines of code are:

var imageFilename = "img.jpg";
var url = new NSUrl(imageFilename, false);
CGImageSource myImageSource;
myImageSource = CGImageSource.FromUrl (url, null);
var ns = new NSDictionary();
var imageProperties = myImageSource.CopyProperties(ns, 0);
// Output ALL teh things
//Console.WriteLine(imageProperties.DescriptionInStringsFileFormat);

// Basic Properties
var width = imageProperties[CGImageProperties.PixelWidth];
var height = imageProperties[CGImageProperties.PixelHeight];
var orientation = imageProperties[CGImageProperties.Orientation];
var dimensions = String.Format ("Dimensions: {0}x{1} (orientation {2})", width, height, orientation);
Console.WriteLine(dimensions); 

// TIFF Properties
var tiff = imageProperties.ObjectForKey(CGImageProperties.TIFFDictionary) as NSDictionary;
var make = tiff[CGImageProperties.TIFFMake];
var model = tiff[CGImageProperties.TIFFModel];
var dt = tiff[CGImageProperties.TIFFDateTime];
var tprops = String.Format ("TIFF: {0} {1} {2}", make, model, dt);
Console.WriteLine(tprops); 

// GPS Properties
var gps = imageProperties.ObjectForKey(CGImageProperties.GPSDictionary) as NSDictionary;
var lat = gps[CGImageProperties.GPSLatitude];
var latref = gps[CGImageProperties.GPSLatitudeRef];
var lon = gps[CGImageProperties.GPSLongitude];
var lonref = gps[CGImageProperties.GPSLongitudeRef];
var loc = String.Format ("GPS: {0} {1}, {2} {3}", lat, latref, lon, lonref);
Console.WriteLine(loc); 

// EXIF Properties
var exif = imageProperties.ObjectForKey(CGImageProperties.ExifDictionary) as NSDictionary;
var fn = exif[CGImageProperties.ExifFNumber];
var focal = exif[CGImageProperties.ExifFocalLength];
var eprops = String.Format ("EXIF: Fstop {0} FocalLength {1}", fn, focal);
Console.WriteLine(eprops); 
Xamarin already has a recipe explaining how to save a photo with metadata.

Sunday, 1 April 2012

CoreImage with MonoTouch (example)

In response to a question on the mailing list over the weekend I put together a quick example of using CoreImage in MonoTouch to adjust the Contrast, Saturation and Brightness of an image. It looks like this:
CoreImage with MonoTouch
The code is available in a gist; to use simply create a new MonoTouch Empty iPhone Project and paste in the code/create the files.
It initially uses a supplied image but you can take a photo with the camera and manipulate that instead. NOTE that when you take a camera image, a 'display copy' is made (scaled down to screen resolution) and the Contrast/Saturation/Brightness changes you make are applied to the scaled-down copy to ensure the UI is responsive and avoid memory issues. If you choose to save the image, the C/S/B values are re-applied to the original image before being saved, so you get an 'original resolution' verison saved to the Camera Roll.

There is also a CoreImage project on Xamarin's github which includes examples of many more CIFilters (see also Apple's docs). Plus there's a Sepia-tone example in the MonoTouch iOS5 doc.

FYI using CIFilters with MonoTouch is very simple as this method shows:
// the CoreImage filter  
CIColorControls colorCtrls;
// apply to an image
UIImage AdjustImage (UIImage image) {
   if (colorCtrls == null)
      colorCtrls = new CIColorControls () {
         Image = CIImage.FromCGImage (image.CGImage),
         Brightness = sliderB.Value, 
         Saturation = sliderS.Value, 
         Contrast = sliderC.Value
      };
   else {
      colorCtrls.Brightness = sliderB.Value; 
      colorCtrls.Saturation = sliderS.Value; 
      colorCtrls.Contrast = sliderC.Value;
      colorCtrls.Image = CIImage.FromCGImage(image.CGImage);
   }
   var output = colorCtrls.OutputImage;
   var context = CIContext.FromOptions (null);
   var result = context.CreateCGImage (output, output.Extent);
   colorCtrls = null;
   return UIImage.FromImage(result);
}

Sunday, 4 March 2012

iCloud UIDocument sample: taskcloud

One of iOS5's biggest new features was iCloud storage - the ability for apps to store data (files) "in the cloud" and access them from multiple devices, with OS-supported server-storage/upload, synchronization and backup.
Although it is possible to access "iCloud" functionality directly from within your code, Apple recommends using the new UIDocument class which has a lot of 'built-in' functionality to help manage iCloud documents. At its most basic, you only need to subclass UIDocument and override two methods (LoadFromContents & ContentsForType) to get it working.

The TaskCloud sample creates a TaskDocument subclass and contains some additional code to retrieve a document list from iCloud. The example is a little contrived - using a separate 'file' for each task might not be the best way to model a to-do list application - but you get the idea: individual tasks are created as files and iCloud synchronizes them across all your devices!
The code is still "under construction" so please forgive any dodgy practices. It also doesn't address the full iCloud API, such as conflict resolution or moving files to/from 'local' storage.

You can download the (MonoTouch) code from Github.

As a reminder, here is the guide for configuring your MonoTouch project for iCloud.


(see also, the iCloud Key-Value storage example)

Wednesday, 29 February 2012

iCloud Key-Value example: chat2self

Apple introduced a new API in iOS5 - iCloud Key-Value Data Storage - which lets your applications share a collection of key-value data between devices (with the same App Store login). It's fairly restricted (limited number of keys, limited data size, and no guaranteed time to sync), but it's also very easy to use.

Because the storage is only shared with the same user, it's pretty useless for a chat program. On the other hand, I was keen to play with Miguel's latest BubbleCell example. The result: a simple chat program that only sends messages between your iCloud-registered devices. Each device uses a single 'key' to save the last message you wrote on that device, and iCloud takes care of sync'ing that out to your other devices. When they receive the sync'd data, a notification kicks in and it appears in the conversation! It's definitely half-duplex...


Grab the (MonoTouch) code from Github. Remember: you'd never actually build a chat-service with iOS5 iCloud Key-Value Data Storage, this is just for fun :-)

UPDATE: some handy tips for setting up iCloud for MonoTouch development.